iOS 11 的一些玩意儿:乱七杂八

iOS 11 的第三篇~~~

iPhone X 发布了。全面屏,Face ID,刘海。扎心了~。就是买不起,肾不够用了。

言归正传,这篇说一些乱七杂八的更新小点吧~~~

iPhone X

启动图

启动图尺寸多了 iPhone X 的尺寸。

Portrait dimensions Landscape dimensions
1125px × 2436px (375pt × 812pt @3x) 2436px × 1125px (812pt × 375pt @3x)

只要把准确的启动图放进去,那么在 iPhone X 上就会自动适配了。当时只需要看哪些 UI 出问题需要修改。

如果是用LaunchScreen.storyboard的话,基本不用更改就适配了。

两个 Bar 的高度

iPhone X 上的 navigationBar 和 tabBar 的高度有了变化~~

iPhone X no iPhone X
navigationBar 44 + 44 = 88 20 + 44 = 60
tabBar 83 49
会闪退的代码

获取statusBar的一些状态,比如电池啊什么的,会用到这样一句代码

1
NSArray *infoArray = [[[[UIApplication sharedApplication] valueForKeyPath:@"statusBar"] valueForKeyPath:@"foregroundView"] subviews];

这代码在 iPhone X 会造成闪退。原因是 iPhone X 没有这个foregroundView

判断是否 iPhone X

iPhone X 的高度是 812 ,所以可以通过这个高度直接判断是不是 iPhone X。

Swift 版本

1
2
3
4
5
6
func iPhoneX() -> Bool {
let size = UIScreen.main.bounds.size
// 防止 屏幕 翻转~~
let maxHeight = max(size.width, size.height)
return maxHeight == 812
}

Objective-C 版本

1
2
3
4
5
- (BOOL)iPhoneX {
CGSize size = [UIScreen mainScreen].bounds.size;
CGFloat maxHeight = MAX(size.width, size.height);
return maxHeight == 812;
}

LargeTitle

iOS 11 的 UI 设计有个特点,更加注重内容吧。所以字体加粗的加粗,变大的变大。总觉得 app store 可以说是这次 iOS 11 设计的一个典型例子~。其中,LargeTitle的出现,也相当于是

p1

开启这个属性很简单。

1
navigationController?.navigationBar.prefersLargeTitles = true

还可以利用富文本可以更改一些属性等。

1
navigationController?.navigationBar.largeTitleTextAttributes = [NSAttributedStringKey.foregroundColor: UIColor.orange]

但一些viewController不需要的时候,可以通过以下代码进行关闭。那么就可以和原先的一样了。

1
viewController.navigationItem.largeTitleDisplayMode = .never

另外,可以对 searchBar 进行一些滑动隐藏

1
navigationItem.hidesSearchBarWhenScrolling = true

UITableView

UITableViewCell左右滑动出现了按钮,多了一些动画效果。另外,代理方法也变化了。

1
2
3
4
5
6
7
8
9
10
11
12
13
14
15
16
17
18
19
@available(iOS 11.0, *)
override func tableView(_ tableView: UITableView, leadingSwipeActionsConfigurationForRowAt indexPath: IndexPath) -> UISwipeActionsConfiguration? {
let action = UIContextualAction(style: .normal, title: "leading") { (action, view, completionHandler) in
completionHandler(true)
}
action.backgroundColor = .blue
return UISwipeActionsConfiguration(actions: [action])
}
@available(iOS 11.0, *)
override func tableView(_ tableView: UITableView, trailingSwipeActionsConfigurationForRowAt indexPath: IndexPath) -> UISwipeActionsConfiguration? {
let action = UIContextualAction(style: .normal, title: "trailing") { (action, view, completionHandler) in
completionHandler(true)
}
action.backgroundColor = .red
return UISwipeActionsConfiguration(actions: [action])
}

另外,iOS 11 上的 UITableView 默认就是开启自动行高的。即——

1
tableView.rowHeight = UITableViewAutomaticDimension

对此,需要对其加上一个 估算行高 。

1
tableView.estimatedRowHeight = 你估算的高度

如果要关闭这个自动行高,只需要把estimatedRowHeight设置为 0 。

对于自动行高,有一点需要记住的,如果 cell 使用

  1. Auto Layout,需要保证 cell 的 subViews 约束正确
  2. Frame Layout,需要重写 sizeThatFit: 这个方法

版本判断

Swift 一直都有的 iOS 版本判断 if #available(iOS 11.0, *) {}。终于在 Xcode 9 中,Objective-C 也可以用了。

1
2
3
if (@available(iOS 11.0, *)) {
// 啪啪啪
}

automaticallyAdjustsScrollViewInsets

iOS 11 之前,用automaticallyAdjustsScrollViewInsets来管理UIScrollView的 subView 的偏移,但是 iOS 11 开始,这属性被废弃。改成contentInsetAdjustmentBehavior了。

1
2
3
4
5
6
7
if (@available(iOS 11.0, *)) {
self.tableView.contentInsetAdjustmentBehavior = UIScrollViewContentInsetAdjustmentNever;
// 如果需要计算内边距,那么就是
self.tableView.contentInsetAdjustmentBehavior = UIScrollViewContentInsetAdjustmentAutomatic;
} else {
self.automaticallyAdjustsScrollViewInsets = NO;
}

定位权限

iOS 11 强推了 使用 app 期间才定位 的权限。需要在 info.plist 文件中添加

1
2
<key>NSLocationAlwaysAndWhenInUseUsageDescription</key>
<string>你的权限使用说明</string>

或者是 ——

p2

最后那个是新增的~~

Xcode

多个模拟器

对哒。Xcode 可以开启多个 模拟器 跑工程。内牛满面啊。有木有~
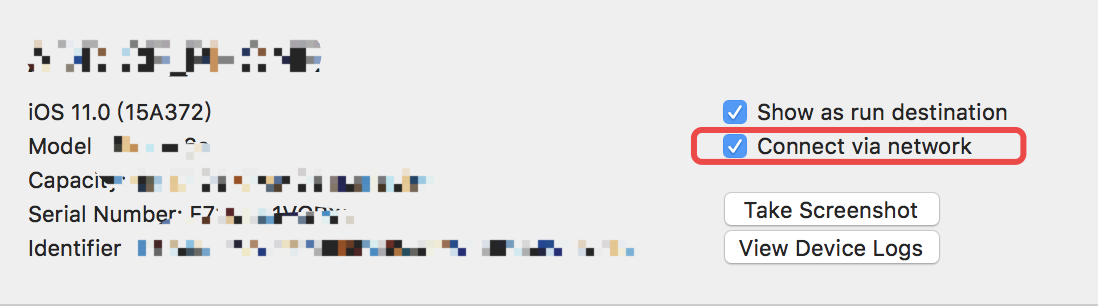
无线 Debug

前去 windows - device and simulators 。

p3

New Build System

File - Project Setting / workspace setting

p4

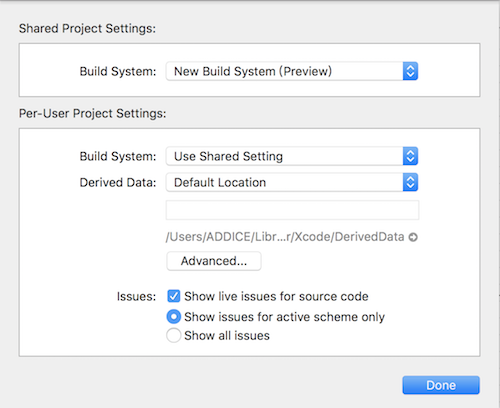
build system 选择 new build system 即可。

该模块是用 Swift 重写。